The Jetson AGX Orin Developer Kit can boot directly into the Ubuntu image that ships on its internal eMMC. That is useful for the first power-on, but an NVMe SSD is a better home for the operating system, JetPack, models, datasets, and container images.
This guide documents the setup I use: the bootloader remains on the eMMC, while the root filesystem lives on the NVMe SSD. The process uses NVIDIA SDK Manager on a separate Ubuntu host computer.
The screenshots in this guide show JetPack 6.2. SDK Manager options can move between releases, but the overall flashing flow remains the same.
What this setup achieves
The developer kit still begins its boot process from internal storage, then mounts the NVMe drive as /. This gives the Jetson the capacity and I/O performance of the SSD without replacing the boot firmware on eMMC.
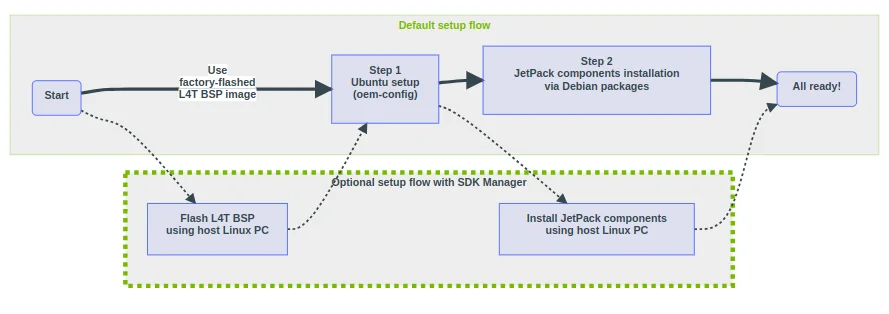
The default setup flow: flash the Linux for Tegra board support package, boot the target, and install the JetPack components.
Before starting, prepare:
- an NVIDIA Jetson AGX Orin Developer Kit with an NVMe SSD installed;
- an x86-64 host computer running Ubuntu 20.04 or 22.04;
- an NVIDIA Developer Program account;
- a data-capable USB Type-C to USB Type-A cable;
- a reliable internet connection and enough free disk space for SDK Manager downloads.
Back up anything important on the target SSD. Flashing will repartition and erase the selected target drive.
Install SDK Manager on the host
Download the Ubuntu .deb package from the NVIDIA SDK Manager page. The filename follows a pattern similar to sdkmanager_[version]-[build]_amd64.deb.
From the directory containing the package, install and launch it:
sudo apt install ./sdkmanager_*-*_amd64.deb
sdkmanager
Sign in with the NVIDIA account associated with your Developer Program membership.
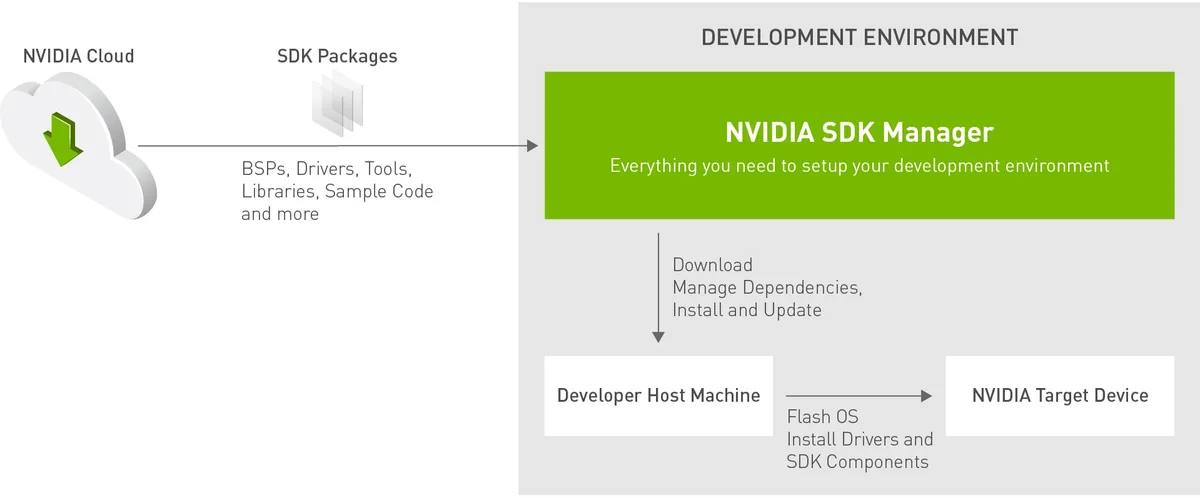
SDK Manager downloads the board support package and development components, then installs them on the host and Jetson target.
Prepare the host for flashing
SDK Manager uses network services during parts of the flashing and component-installation process. Install the NFS packages and restart the required services:
sudo apt update
sudo apt install nfs-common nfs-kernel-server
sudo systemctl restart rpcbind nfs-server
If the host firewall blocks the process, temporarily disable it while the host and Jetson are connected on a trusted network:
sudo ufw disableRe-enable the firewall after the installation:
sudo ufw enablePut the Jetson into Force Recovery Mode
Use the USB Type-C port nearest the GPIO header for the data connection to the host.
- Power off the developer kit.
- Connect the Jetson’s recovery USB Type-C port to a USB Type-A port on the host.
- Hold the middle Force Recovery button.
- While holding it, connect power to the developer kit.
- Release the Force Recovery button, then launch
sdkmanageron the host.
SDK Manager should detect the target hardware automatically. If it does not, try a different data-capable cable or host USB port before changing the software configuration.
Select the target and JetPack release
In Step 01, choose Jetson as the product category, confirm that SDK Manager detected the AGX Orin target, and select the JetPack version you intend to deploy.
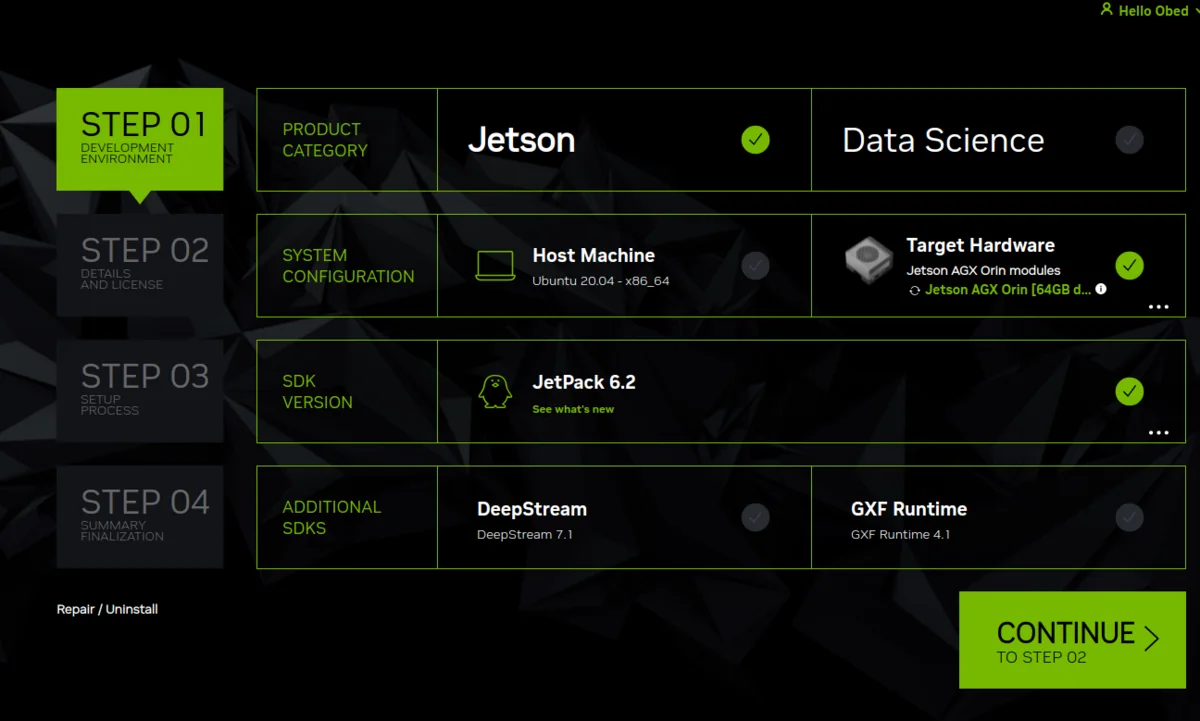
Target configuration for the AGX Orin Developer Kit and JetPack 6.2.
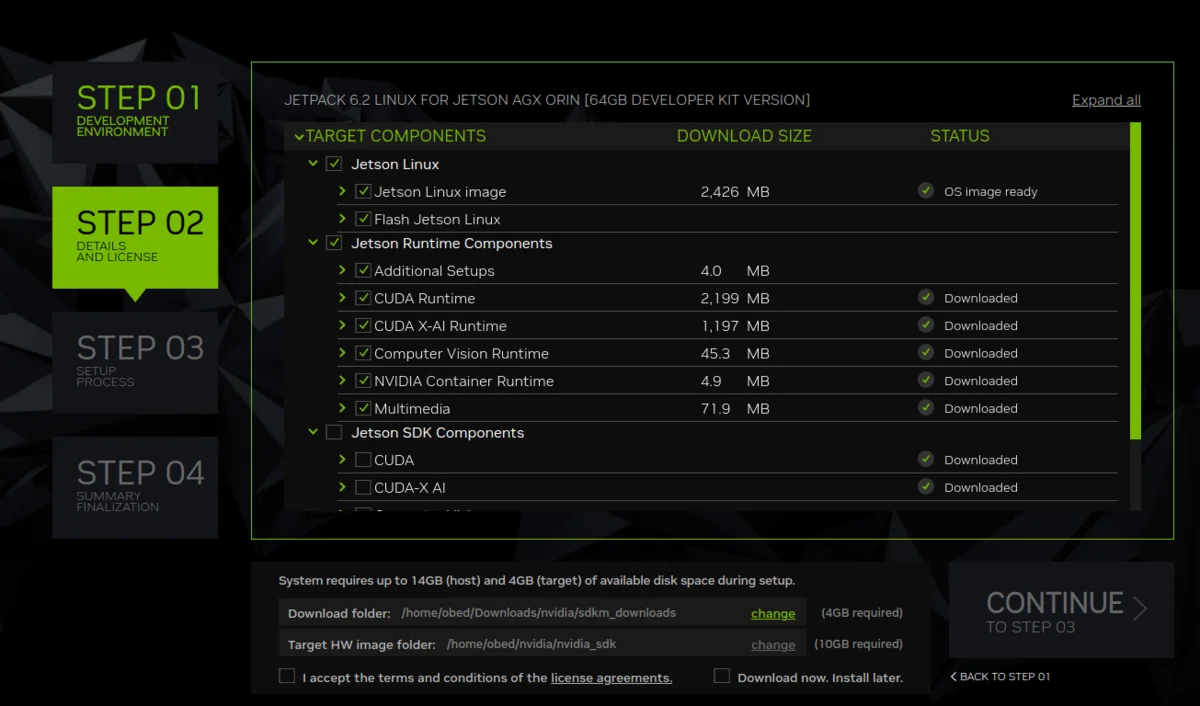
Continue to Step 02 and review the components. Keep Jetson Linux selected because it contains the operating system and board support package. Select the additional SDK components you need, then accept NVIDIA’s licence terms.
Review the host and target components before starting the download.
Choose NVMe as the root filesystem
When SDK Manager opens the pre-installation dialog, use the automatic setup if the Jetson is already in recovery mode. For Storage Device, select the installed NVMe drive rather than eMMC.
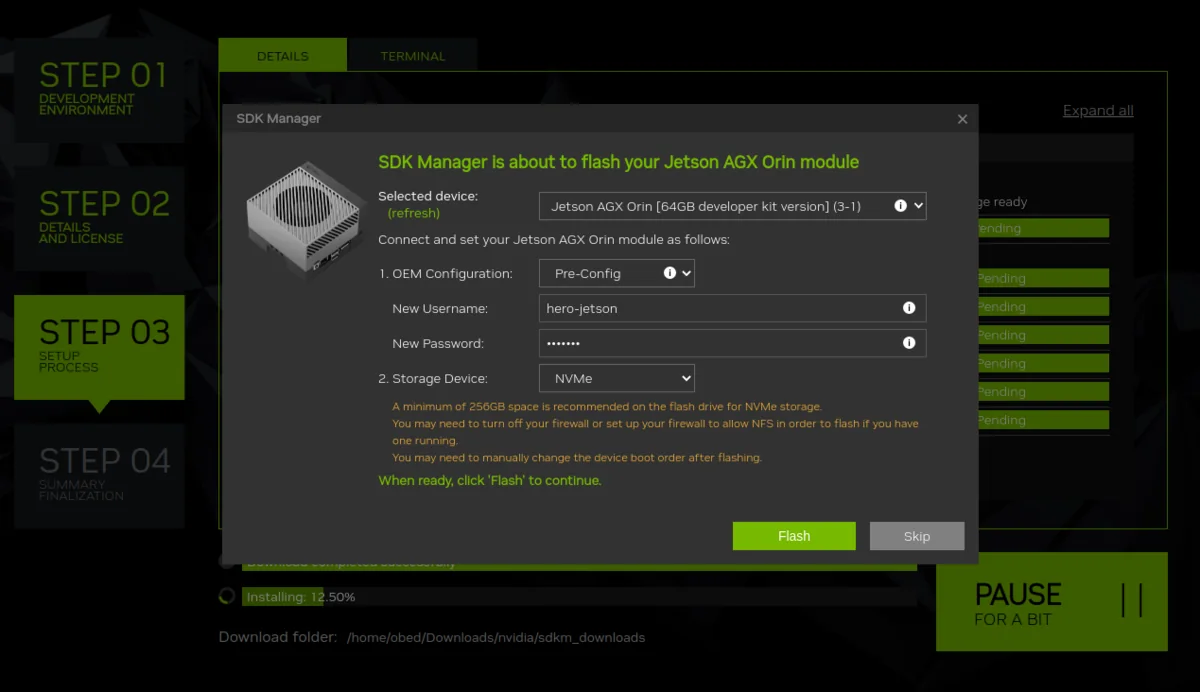
The critical choice is the storage target: select the NVMe device for the root filesystem.
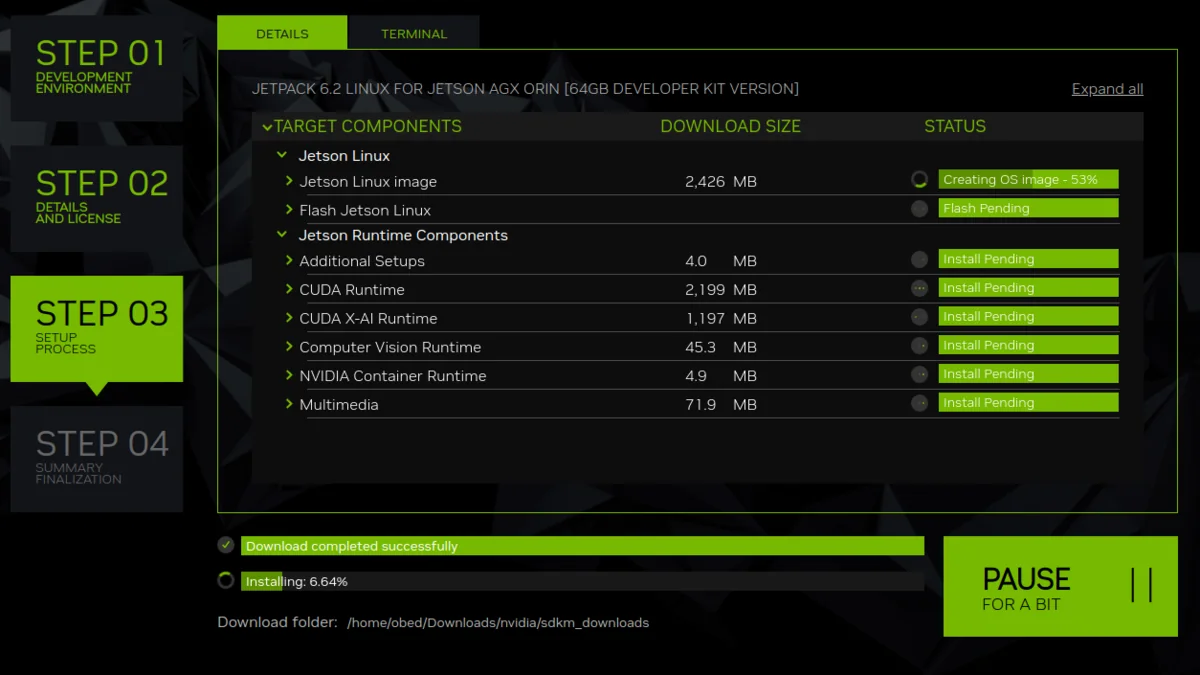
Confirm the flash settings and begin the operation. SDK Manager downloads the required files, prepares the image, repartitions the selected drive, and flashes the system. Do not disconnect power or USB while this is running.
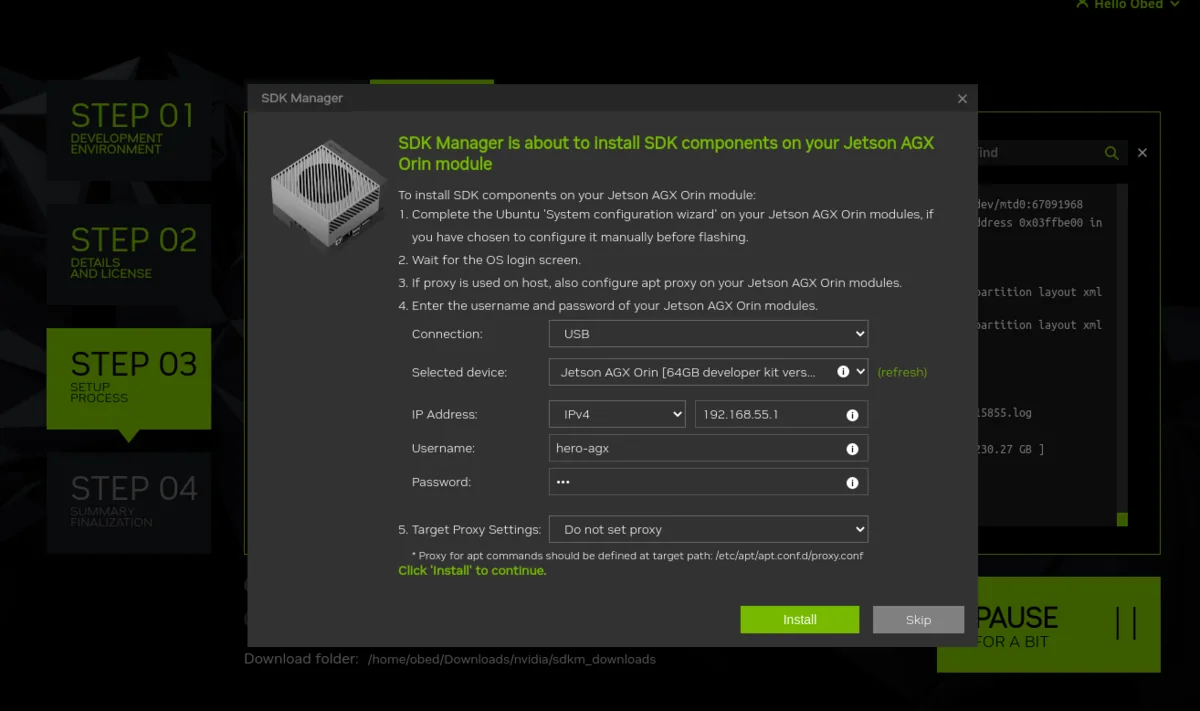
Set the initial Ubuntu account and network details that SDK Manager will use after the first boot.
Complete the runtime installation
After a successful OS flash, the Jetson reboots from its new system. SDK Manager then connects to the running device and installs the selected Jetson runtime components.
The final SDK Manager stage installs CUDA, cuDNN, TensorRT, OpenCV, and the other selected target packages.
The exact duration depends on the host, SSD, network connection, and selected components. Wait until SDK Manager reports that the installation has completed before disconnecting the board.
Verify that the Jetson is using NVMe
Open a terminal on the Jetson and inspect the device mounted at /:
findmnt /
lsblk -o NAME,SIZE,FSTYPE,MOUNTPOINTS
The root mount should resolve to a partition on the NVMe device, commonly named something like /dev/nvme0n1p1. The eMMC remains present for the boot chain, while Ubuntu and JetPack run from the SSD.
With the platform ready, the next step is to validate the CUDA and TensorRT installation and continue with the Jetson AI Lab tutorials.
Troubleshooting checklist
If the target is not detected or flashing stops unexpectedly, check the basics first:
- verify that the USB cable supports data, not only charging;
- confirm that the cable is connected to the recovery-capable Type-C port;
- re-enter Force Recovery Mode before relaunching SDK Manager;
- make sure the correct NVMe target is selected;
- confirm that the NFS services are running on the host;
- avoid hubs and connect the Jetson directly to the host;
- keep the host and target on a stable, trusted network during component installation.
These checks resolve most failures without requiring a manual command-line flash.